Rave
Introduction
Rave is a sound editor for AmigaOS4-compatible computers. It provides functionality for manipulating and storing digital audio files.
Feature overview
A modern, configurable graphical user interface (GUI).
A tabbed environment for managing multiple projects from within a single program window.
A powerful custom file requester with preview playback and other useful features.
A wide selection of editing functions with unlimited Undo.
Asynchronous operation: performing a task in a project doesn't block the other projects.
Support for multiple clipboard units.
Modular design with an object-oriented plugin system, which makes the program easy to extend.
A wide range of supported audio file types and formats.
Developed by an Amiga musician for Amiga musicians!
Missing pieces
Please note that this program is work in progress, so several key features are still missing. Among others:
recording is not implemented yet;
the plugin system works as a proof of concept (the Level and the Fade functions in the Process menu are in fact implemented as plugins, although they are compiled in the main program binary) but no actual plugin set is provided yet to add effects and other processing.
Legal notes
The information contained in this document is subject to change without notice and does not represent a commitment on the part of the author and publisher of the software. No part of this publication may be copied, reproduced or otherwise transmitted or recorded, for any purpose and in any form, without prior written permission by Rear Window Software.
All product and company names mentioned in this document are ™ or ® trademarks of their respective owners.
© Rear Window Software, 2022–2024. All rights reserved.
Disclaimer
The program and all of its components, including but not limited to external modules, plugins, language catalogs and documentation (the “software”), are provided “as is”. The author and publisher accept no responsibility and shall not be held liable for any damages, direct or indirect, including but not limited to loss of data, equipment or profits caused by the use of the software. You use the software solely at your own risk.
Copying
The program is available free of charge for any use (private or corporate, non-commercial or commercial), and may be copied without restrictions as long as all parts of the program including its documentation are kept together.
Additional components extending the functionality of the program may be provided on a commercial basis. Copying and distribution of these components is forbidden.
Without prior written consent of the author or publisher, it is explicitly forbidden to distribute this program as part of a software compilation, collection, magazine cover disc or a similar product, physical or electronic, non-commercial or commercial.
Requirements
System
The program requires AmigaOS 4.1 Final Edition Update 2 or newer. Older versions of the operating system are not supported.
For its user interface, Rave needs several of the Enhancer Core classes (namely: toolbar.gadget, infodata.gadget, select.gadget, and shared.image). You can obtain these classes either as part of Enhancer Software (a commercial package published by A-EON Technology; version 2 or higher required), or they can be downloaded for free from www.amisphere.com (look for a product called Enhancer Software Core).
The program will run on any AmigaOS4-compatible computer, including emulated systems such as WinUAE. But as audio operations can be very resource-intensive, fast systems with more memory will provide a much better experience compared to entry-level systems. The difference between running Rave on a faster computer and a slower one is noticeable in many cases.
Use the program with regard to your computer's specifications. Do not expect stellar performance editing long high-definition audio files on a low-end machine.
Rave is developed on an AmigaOne X5000/020 computer, designed and manufactured by A-EON Technology Ltd.
Memory
If your computer has 2 GB of RAM or more, Rave can utilize the extra memory that is otherwise unavailable to the Amiga operating system and applications. This feature, known as extended memory, is optionally used in Undo operations. 4 GB of RAM will provide optimum price/performance ratio.
Please note that for technical reasons, AmigaOS4 does not support extended memory on Pegasos II computers, regardless of the amount of RAM installed.
Sound card
Rave does not depend greatly on audio hardware: the program will work with any sound card or audio chip supported by the AHI audio system. However, the quality of the audio hardware affects the quality of playback and recording. So while a common "multimedia" card or audio chip will not prevent you from using any of the program's functions, a studio-level sound card will certainly do a better job.
Hard disk
The program itself doesn't require a lot of storage capacity, but audio data does. Today, most sound material you can get from the various sample providers is stored in the 24-bit Wave format (.wav), so your sound collection may soon grow very large. It is, therefore, advisable that you think ahead and equip your Amiga with a hard disk large enough to accommodate your future storage requirements.
Also note that unless your system allows using extended memory, Undo operations will use the hard disk to store temporary files. Projects with a long editing history can take up a considerable amount of disk space!
Installation
At the moment just extract the program drawer to a suitable location on your disk. A proper installation script will be provided at a later point.
Supported file types and formats
The table below gives an overview of the audio file types, formats and containers supported by the program. Most of these are read-only at the moment; relevant formats will receive support for saving in the upcoming releases.
| Format | Suffix(es) | Description / Notes | Support |
|---|---|---|---|
| AIFF | .aiff, .aifc, .aif | Audio Interchange File Format, an audio format based on the IFF standard and used widely on Apple computer systems. | read / write |
| Audio Visual Research | .avr | A lossless format used mainly on Apple Macintosh and Atari ST computers. | read |
| Core Audio File | .caf | An audio container format developed by Apple. | read |
| Creative Voice | .voc | A format developed by Creative Labs for storing uncompressed audio data to be used with the SoundBlaster series of sound cards. | read |
| Dialogic VOX ADPCM | .vox | An audio file format optimized for storing digitized voice data at low sampling rates. Mostly used in telephony and speech applications. | read |
| Ensoniq PARIS | .paf | A proprietary file format designed for the PARIS digital audio workstation sold by Ensoniq and, later, E-mu Systems. | read |
| IFF-8SVX | .iff, .8svx | The standard Amiga format for 8-bit sounds, developed by Electronic Arts. Only uncompressed data is supported (8SVX files using the optional Fibonacci-delta compression are extremely rare anyway). | read / write |
| IFF-16SV | .16sv | An unofficial extension of the IFF-8SVX format that supports 16-bit audio data. | read |
| FLAC | .flac | An open format and lossless audio codec, developed by the Xiph.Org Foundation. | read / write |
| MIDI Sample Dump Standard | .sds | A format for transmitting waveform data over MIDI using the Sample Dump Standard protocol. The protocol only supports mono files. | read |
| MPEG Audio Layer II | .mp2 | A lossy audio compression format, now superseded by MPEG Audio Layer III. | read |
| MPEG Audio Layer III | .mp3 | Arguably the most popular lossy compression format for audio files. | read / write |
| NIST SPHERE | .nist | A format defined by the National Institute of Standards and Technology (NIST) and used mainly with speech audio. | read |
| Ogg Vorbis | .ogg | An open-source, general-purpose format for compressed audio data. | read / write |
| Opus | .opus | An open, lossy audio coding format from the Ogg family, developed by the Xiph.Org Foundation. | read |
| Psion WVE | .wve | An audio format used on Psion Series 3 PDA devices. | read |
| raw data | .raw or no suffix | A file that is not stored in one of the supported formats. | read / write |
| Sony Wave64 | .w64 | A 64-bit audio container format designed to overcome some of the limitations of the Wave format. | read |
| Sun/NeXT Audio | .au, .snd | A simple audio file format used on Sun, NeXT and DEC systems. | read |
| Wave | .wav | An industry-standard file format for uncompressed audio, developed by Microsoft and IBM. | read / write |
Raw data
Any file that is not stored in one of the supported formats can be imported as raw data. Raw files do not have a standard suffix but ".raw" is commonly used, which is what Rave expects (but doesn't require). In order to get raw files displayed in the Open File requester, you need to set the Show chooser to "All supported files" if the files carry the ".raw" suffix, or to "All files" otherwise.
Raw is not an actual file format and the files are headerless, so audio programs have no way to obtain any information about the data. Properties such as sample rate, number of channels, bit depth etc. need to be provided by the user in the Import window:

The program interprets the data solely based on the given properties. This means that if the same file is loaded each time with different properties, the resulting waveform and sonic qualities will be different.
Common tasks
This chapter describes a few general tasks that you will commonly perform when working with Rave. Getting familiar with these tasks will allow you to work more effectively with the program.
Opening files
There are several ways to open existing audio files in Rave:
Using the file requester
The editor provides a custom file requester that is tailored to handling audio files. The requester is described in more detail in the "User interface and controls" chapter.
By drag-and-dropping
The entire main window of the editor acts as a "drop zone" into which file icons can be dragged from the Workbench. It is possible to open multiple files at once by drag-selecting or SHIFT-selecting their icons, and dragging them into the program window. (See this section of the AmigaOS Documentation Wiki for information about selecting multiple icons in the Workbench.)
When starting from the command line
Launching the program from a command-line interface (such as the Shell) allows you to pass audio file names as program parameters. No keywords are necessary: any text string following the program name will be interpreted as a file name. For example, after executing the following command sequence, Rave will start up and attempt to load three data files:
> Rave bells.wav bass2.wav mix.mp3AmigaDOS rules apply, so if the files are located in a different directory, it is of course necessary to specify the full path name. Names that contain spaces must be enclosed in quotation marks:
xxxxxxxxxx> Rave Samples:FX/bells.wav Samples:Bass/bass2.wav "DH2:Music/party mix.mp3"When starting from the Workbench
A perhaps less known but very useful feature of the Amiga Workbench environment is that when launching a program from its icon, names of other files can be passed to it as parameters (thus mirroring the possibilities in the command line). To achieve this, select an icon or a group of icons, and then start Rave with a SHIFT-click rather than a normal click. For each file icon, the Workbench will pass the respective details to Rave, and if the file is of a supported type, the program will attempt to load it.
Via the Application Library
Any AmigaOS4 program registered with the Application Library can tell Rave to open a specific audio file, by sending it an APPLIBMT_OpenDoc command. The command accepts no more than one file name as parameter, so for opening multiple files you'll need to send a series of commands. See the relevant section of the Application Library documentation for more details.
Working with projects
A piece of audio data loaded into (or created by) Rave is called a project. A program session can theoretically hold any number of projects, although in real use memory limitations will apply. You access your projects through the Project Tab Bar in the main window. Clicking on a tab will bring the respective project into focus and display its waveform in the window. The project currently in focus is referred to as the active project.
Editing and processing operations, as you start them from the menu or the toolbar, are always applied to the active project. This, however, doesn't mean that the other projects have to stay inactive! Rave projects run asynchronously, so it is possible to start an operation and then continue working on another project.
The active project can be closed:
by selecting the Close command in the Project menu;
by clicking on the close gadget in the project's tab;
by pressing the Escape key (unless the project is busy, in which case the key will abort whatever is in progress).
Making selections
Most editing operations require that you make a selection first. A selection is a marked range in the waveform area of the editor. Selections are made with the mouse.
In a stereo project, single-channel selections are possible. In order to mark a range in the left channel, click and drag the mouse in the upper half of the channel area. To make a selection in the right channel, click and drag the mouse in the lower half of the channel area. The individual channels can also be selected using the respective commands in the Edit menu.
Once created, a selection can easily be modified. Hold the Left Shift key and click the mouse button to change the beginning of the selected area. Hold the Right Shift key and click the mouse button to modify the end of the selection. A selection can also be extended in several ways using the respective commands in the Edit menu.
Reverting changes (Undo)
Any editing or processing operation that modifies the waveform data (a "destructive operation") can be reverted by using the Undo item in the Edit menu, the Undo button in the toolbar, or the keyboard shortcut: RAmiga + Z.
Rave features unlimited Undo, meaning that you can go back as many steps as you like. Each project keeps its own "undo history", independent of other projects. You can use the "Clear undo history..." function in the Edit menu if you know that you will no longer need the undo possibilities, or as an emergency measure when you are running out of memory or disk space. A requester will appear informing you about the amount of resources you will gain by this operation.
The majority of destructive operations require that a portion of the original data is stored, so that it can be retrieved in case you need to undo. Where the data is actually stored can be configured in the program settings.
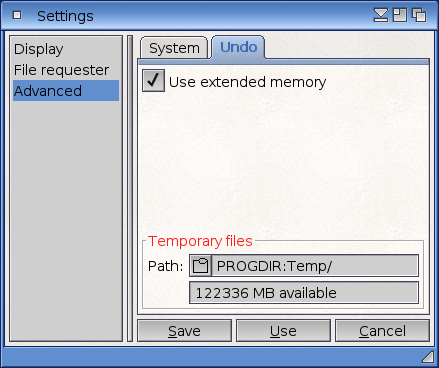
If your computer is equipped with 2 GB of RAM or more, undo data can be saved in extended memory – the memory space that is normally unavailable to AmigaOS applications. Alternatively, the data is stored on your hard disk in the form of temporary files. For this to work, you have to select a suitable path for such files in the Settings, making sure that the disk has enough free space available. By default, the Temp subdirectory in the program drawer is used.
Changing the settings on the fly does not affect existing Undo histories. Should you decide to change the way of storage or select a different temporary files path after projects have been edited, the program will still be able to retrieve the respective data.
Using extended memory is faster, so it is the preferred (and default) option on 2 GB+ machines.
Disk-based undo will be used if:
your system doesn't support the extended memory feature (Pegasos II computers),
your system has less than 2GB of physical RAM installed,
you have deselected the "Use extended memory" option in the Settings,
saving to extended memory has failed for some reason.
Please note that using extended memory on a 2 GB system is a compromise, and the program will start to deplete regular system memory as undo data grows in size. This may or may not be a problem, depending on the size of the data and the number of applications running along with Rave. In general, using extended memory on such a system is fine unless the undo data swells to several hundreds of megabytes. However, it is recommended to install more memory if your computer supports it. Based on experience, 4 GB of RAM will provide optimum price/performance ratio.
Using the clipboard
Rave uses the system clipboard for exchanging data between projects or other audio applications. To better understand how this works, please read the following implementation note.
AmigaOS specifies that data in the clipboard needs to comply with the Interchange File Format (IFF). However, this specification is decades old and not good enough for modern audio applications. The main problem is that the original IFF standard only accounts for 8-bit audio data. Without an updated official specification clearly saying how to put 16-, 24- or 32-bit sounds in the AmigaOS4 clipboard, different applications may implement support for such data in different ways.
Rave uses the following solution: 8-bit audio data is stored in the IFF-8SVX format to make clipboard exchange backwards compatible, whereas anything above 8 bits is formatted as AIFF.
Up to three clipboard units can be used for editing, or temporarily storing data. When a given unit is busy because an operation is in progress, switching to another unit will make the clipboard available for more editing. Unit 0 is used by default but this can be changed in the Settings. During program runtime you can easily switch between units 0–2 using the Edit menu or relevant keyboard shortcuts.
Please note that the Amiga clipboard was not designed for exchanging large amounts of data. The system clipboard works fine for text, bitmap graphics or short sounds, but a substantial chunk of high-definition audio can take a lot of time to process, especially on low-end systems.
User interface and controls
Getting to know Rave won't give you any headaches because the program uses a no-nonsense user interface where everything is easy to find. Rave takes the single-window approach: most functions and operations are executed from within the main program window. This has several advantages. First, the main window encompasses the key control elements, so everything is right at hand. Second, not having to click through a plethora of sub-windows and "palettes" streamlines the workflow and lowers the learning curve. And third, this approach saves screen estate, allowing you to use Rave along with other software on the Workbench screen. It's really not necessary to run the program on its own screen just in order to maintain good overview.
Main window
The main window is the place where you select, view, play back and edit your audio projects.
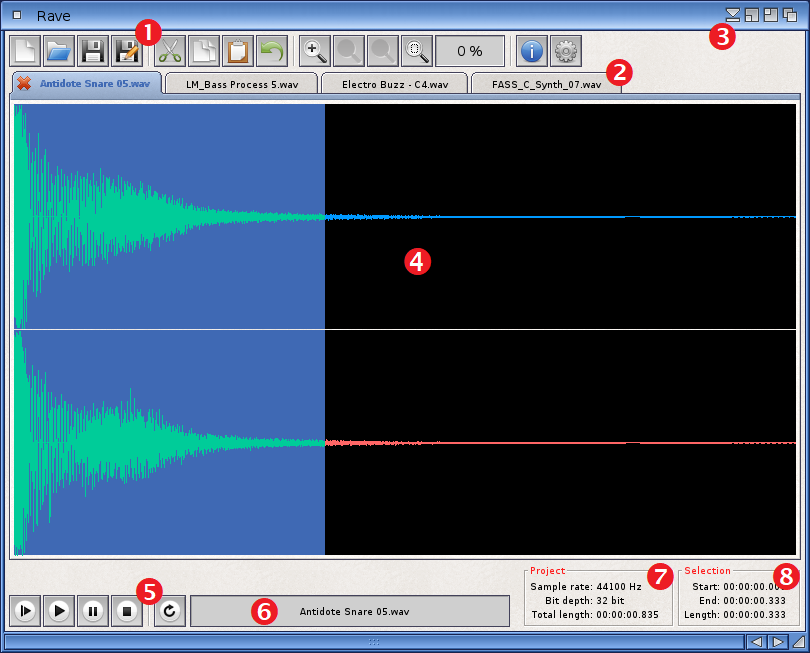
At the top of the window, the Toolbar (1) provides access to some of the most commonly used functions.
Right below the Toolbar, the Project Tab Bar (2) allows selecting between the currently open projects. Each tab represents one project; if none are open, the Tab Bar is not displayed. The tab of the active project also displays a close gadget so that the project can easily be closed from within the Tab Bar.
In the top-right corner of the window, the Pop-up Gadget (3) displays an auxiliary menu that contains several useful commands for manipulating the program window.
The Waveform Display (4) takes up the majority of the window, and shows the audio waveform of the active project.
At the bottom, the Transport Bar (5) controls sample playback. The bar currently contains four buttons (Play All, Play, Pause, Stop) and one switch that toggles looped playback. Visual indication is provided when a transport function is engaged: the respective button becomes highlighted and changes colour (green for playback, orange for paused state). For convenience, all of the transport buttons can be controlled through keyboard shortcuts.
Next to the Transport Bar, the Status Bar (6) shows information related to the active project. When the project is idle, the status bar displays the project name. When an operation is in progress, the bar displays the name of the operation together with a progress indicator.
Further to the right, the Project Properties Box (7) displays an overview of the audio properties of the active project: sample rate, bit depth, and total length. Please note that the bit depth refers to the number of bits used to store the project data in memory, not in the source audio file. Compressed file formats that do not work with a particular bit depth are always decoded into 24 bits, to preserve detail. For example, an MP3 file created from a 16-bit audio track will be loaded as a 24-bit project in Rave.
In the bottom-right corner of the window, the Selection Box (8) displays information about the start, end and length of the current sample selection. If the active project has no selection, the box will be empty.
Menu strip
Most commands and options are available from the program's main menu strip. Therefore, taking a look at the main menu is a good way to get a quick overview of what functionality is available.
Some of the menu commands have a keyboard shortcut associated with them, for faster access.
Project menu
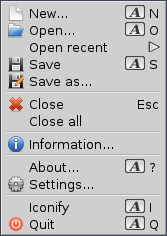
New... (shortcut: RAmiga + N)
Creates a new (empty) audio project. The New Project window will open for specifying the audio properties such as sample rate, bit depth and number of channels.
Open... (shortcut: RAmiga + O)
Brings up the Open requester, from which you can select one or more audio files to be opened in the editor.
Open recent
Displays a submenu with a list of recently opened files. The list can be cleared at any time by selecting the "Clear list" item at the bottom of the submenu.
Save (shortcut: RAmiga + S)
Saves the current project on disk.
Save as...
Before saving the current project, this function brings up the Save requester, in which you can specify the file name and location (path) as well as configure the file type and audio format.
Close (shortcut: Esc)
Closes the current project.
Close all
Closes all currently opened projects. A confirmation requester will be displayed for unsaved projects, as well as for projects that are busy performing an operation.
Information...
Brings up the Project Information window to show the audio properties, metadata and other attributes of the current project.
About... (shortcut: RAmiga + ?)
Displays the About requester with information about the program.
Settings...
Opens the program settings window.
Iconify (shortcut: RAmiga + I)
Sends the program to iconified state: closes the program window and reduces it to an icon on the Workbench screen.
Quit (shortcut: RAmiga + Q)
Closes all currently opened projects and quits the application. A confirmation requester will be displayed for unsaved projects, as well as for projects that are busy performing an operation.
Edit menu
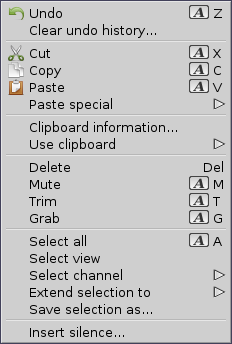
Undo (shortcut: RAmiga + Z)
Reverts changes made to the current project.
Clear undo history...
Clears the current project's editing history, freeing all associated memory and/or disk space.
Cut (shortcut: RAmiga + X)
Removes the selected area and stores the deleted sample data in the clipboard.
Note: Cutting very long sample areas can take a lot of time, especially on slower systems. If you don't necessarily need the data in the clipboard, prefer to use the Delete function, which is much faster.
Copy (shortcut: RAmiga + C)
Copies the selected area to the clipboard.
Paste (shortcut: RAmiga + V)
Pastes the clipboard data at the current position.
Paste special
This submenu contains several functions that allow you to paste the clipboard data at a different position:
Prepend (shortcut: RAmiga + ,)
Pastes the clipboard data at the beginning of the current project.
Append (shortcut: RAmiga + .)
Pastes the clipboard data at the end of the current project.
Paste at...
Pastes the clipboard data at a position specified by the user. The position is given as a time value in the format hr:mn:sc.msc (hours, minutes, seconds, milliseconds).
Paste to new project
Creates a new project and fills it with the clipboard data.
Clipboard information...
Brings up the Clipboard Information window to give you an overview of the current contents of clipboard units 0, 1 and 2.
Use clipboard
This submenu allows switching between clipboard units on the fly. The currently selected unit is the one that will be used for editing operations.
Delete (shortcut: Del)
Works the same as Cut but does not store the deleted sample data in the clipboard.
Mute (shortcut: RAmiga + M)
Sets the audio data in the selected area to zero (silence).
Trim (shortcut: RAmiga + T)
Deletes all sample data except the selected area.
Grab (shortcut: RAmiga + G)
Creates a new project containing data copied over from the selected area.
Select all (shortcut: RAmiga + A)
Selects the entire waveform.
Select view
Selects the part of the waveform that is currently in view. (If the waveform display is fully zoomed out, this function is identical to Select all.)
Select channel
If the current project is stereo, this submenu allows you to select either the left or the right channel. The submenu will be unavailable if the project is mono.
Extend selection to
This submenu allows you to extend the current selection in several ways, without having to do it manually.
Save selection as...
Brings up the Save requester, from which the current selection can be saved to disk as an audio file.
Insert silence...
Allows you to insert a stretch of silence (empty data) in the project. The actual length and position of the data is specified in the Insert Silence window. The length is given as a time value in the format hr:mn:sc.msc (hours, minutes, seconds, milliseconds). Up to 10 minutes of silence can be inserted in one go.
View menu
This menu contains functions related to zooming the project waveform.
Process menu
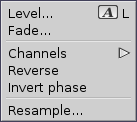
Level... (shortcut: RAmiga + L)
Allows changing the signal level of the sample. Some audio editors call this command "Volume", although such a term is not really accurate.
Fade...
Applies a gradual increase (fade in) or decrease (fade out) in the signal level. Several options are available to finetune the fade curve.
Channels
This submenu contains several functions for manipulating the channels of the waveform:
Convert...
Converts a stereo waveform into mono, or a mono waveform into stereo.
Swap
Moves the sample data in the left channel to the right channel, and vice versa. This command is unavailable when processing a mono sample.
Split
Extracts the left and the right channel of a stereo waveform into separate mono projects. This command is unavailable when processing a mono sample.
Reverse
Reverses the selection, as if playing a tape backwards.
Invert phase
Inverts the phase of the audio signal: turns the waveform "upside down" by making negative sample values positive, and vice versa. This operation can be used to fix phase problems in stereo recordings. It doesn't have an audible effect on mono samples.
Resample
This function allows you to modify the sample rate and/or the bit depth of an audio project. For sample rate conversions, four different quality settings are available (these are not relevant to the bit depth conversion). Rave provides a high quality resampler that uses band-limited interpolation to achieve the best results. This makes it ideal for upsampling, i.e. conversion from a lower sample rate upwards. Unlike in most other Amiga audio editors, upsampling in Rave can actually improve the sound quality, as the interpolation filters try to reconstruct the signal that would have been obtained by sampling at a higher rate.
Please note that the "Best" and "Very good" quality settings will make the conversion very slow. The process can take several minutes on entire audio tracks.
Keyboard control
Rave has a number of useful keyboard shortcuts – dedicated keys or key combinations that provide an alternative way to do things you would typically do with the mouse. Keyboard shortcuts often help you get work done faster and more efficiently.
Several commands in the program's main menu strip have a corresponding keyboard shortcut associated with them. These include common editing functions such as Cut, Copy, Paste or Delete, among others. See the Menu strip section above for more information.
The Escape key
The Escape key (Esc) has a triple function in the program, depending on the current state of the active project:
It will close the project (i.e. it acts as an equivalent to the Close command in the Project menu) when the project is idle.
If, on the contrary, there is an operation in progress, the Esc key will abort the operation. This works on loading, saving, processing as well as clipboard operations. A query requester will be displayed for the user to confirm the aborting.
If sound is playing, pressing the Esc key will stop the playback.
Transport shortcuts
For convenience, the commands in the Transport Bar can be accessed through the following keyboard shortcuts:
| Key(s) | Command |
|---|---|
| Space bar | Play / Stop |
| Space bar + Shift | Play All |
| Esc | Stop |
| P | Pause |
| Q | Toggle looped playback |
Mouse wheel
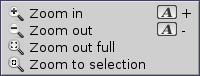
The mouse wheel controls the waveform zoom level, providing a handy alternative to the Zoom In and Zoom Out functions in the View menu and the program toolbar.
In GUI gadgets used for entering numerical or time values, the mouse wheel can be used to increase or decrease the particular value. The gadget must be active (selected) for this to work.
File requester
Rave uses a custom requester for file operations. It has been designed to address the specific needs of an audio editor and to provide functionality that is not supported by the standard system ASL requester, while retaining a similar look and behaviour.
The left-hand side of the requester features the Access Panel, which allows selecting from a list of volumes, assigns or favourites. In the Volumes section you will see the current list of DOS volumes. The Assigns section holds the current list of DOS assignments. Bold print indicates a multi-assign, i.e. an assignment that refers to more than one directory. Double-clicking on a multi-assign opens a pop-up menu that lists all directories associated with the given assign. At the bottom of the Access Panel, the Favourites section contains user-defined "shortcuts" to frequently used (sub)directories.
On the right, about two thirds of the requester are occupied by the File List, which displays files and directories (drawers) found under the current path. The path is shown, and can be changed, in the string gadget located right above the File List. The adjacent Parent button takes you back to the previous directory level, and updates the path gadget accordingly. On the very right, a pop-up gadget opens the Browsing History menu for selecting recently used paths.
Open mode
The file requester operates in two modes. In the Open mode the requester is used to open audio files.
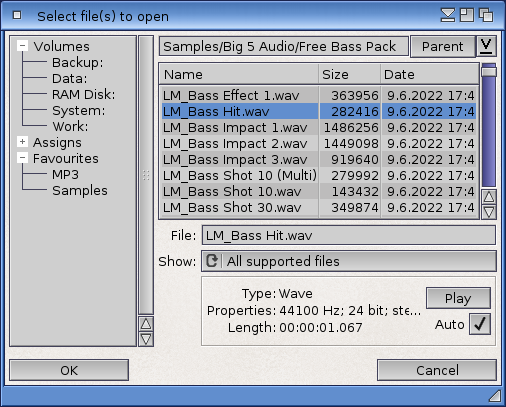
Which files get displayed in the File List depends on the setting of the Show chooser gadget, situated below the list. By default the chooser is set to show all supported file types; this is the recommended setting unless you work with one specific file type only. In the Open mode, the File List allows selecting several items (i.e. opening several files) at once.
Below the Show chooser you will find the File Properties box. In the Open mode, the box will show the main audio properties of the currently selected file: sample rate, bit depth/rate, number of channels (mono or stereo), and time duration.
You can use the Play button, or press the space bar, to audition ("preview") the selected audio file without opening it. During playback the button works as a Stop button; click (or press the space bar) again to stop the playback.
Tick the Auto check box if you want to automatically play the file when it is selected. The default setting of the check box can be configured in the File Requester section of the program settings.
Please note that when auditioning a file from an optical drive, skipping or stuttering might occur, especially on slower systems.
Save mode
The requester is in the Save mode when you choose to save the active project or a selection in the project (see the Edit menu for the respective command).
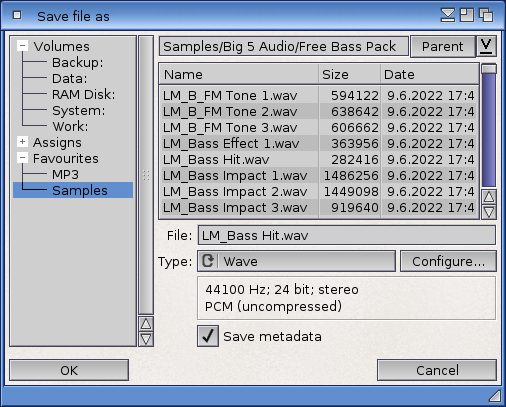
In this mode only one file can be selected from the File List. Which files get displayed depends on the setting of the Type chooser gadget, situated below the list. By default the chooser is set to show the type (format) the file was last saved in.
Further below, the File Properties box will show a summary of the audio properties so that you can review them before saving. If configuration is supported for the given file type, the Configure button will be enabled to bring up a window in which you can modify (some of) the file's properties.
At the bottom of the requester, the Save Metadata check box determines whether information such as title, artist name, creation date etc. should be saved as part of the audio file. The check box is selected by default but this can be changed in the program settings.
User support
For software news, announcements, progress updates and more general Amiga-related writing visit the Rear Window website and blog at www.rearwindow.cz.
If you want to support the various Rear Window activities, join us at Ko-fi.com, where you can also send donations.
Frequently asked questions
Q: Will Rave support multi-channel audio / multi-tracking?
A: No, Rave is a classic audio editor for mono or stereo sounds. It wasn't designed for multi-channel or multi-track operation.
Q: Do you plan to port Rave to AmigaOS3.x / MorphOS / AROS? You'll get more users!
A: Unfortunately, no. Rave has been written with AmigaOS4 in mind and uses resources that may not be available or may work differently on other platforms. Also, maintaining the source code and testing the program for several different target operating systems requires a lot of effort, which the potentially larger user base simply cannot justify.
Q: Why isn't the program localized?
A: Rave is localized internally, but as the editor is still work in progress, things keep changing all the time. The locale catalog descriptor will be sent out for translation as soon as the user interface text is stable enough.
Q: I see the program cannot run on its own screen. Will that be implemented at a later point?
A: No, because I don't think it is needed. As already explained at the beginning of the User interface and controls section above, Rave uses a single-window interface, so you'll rarely find yourself in a situation where you have more than two Rave windows open on the screen at the same time. For applications that use many sub-windows, toolboxes and palettes, running on a dedicated screen makes every sense because it prevents clutter, but for Rave it's just a waste of graphic memory. Also, using a dedicated Rave screen would mean losing the possibility to open files by drag-and-dropping them from your Workbench drawers.
Credits
The program was conceived and developed by Daniel Jedlička, © Rear Window Software.
The program logo and splash screen graphics were designed by Jan Gřešek.
The program and drawer icons were drawn by Martin Merz.
The toolbar and menu images were created by Eugen Buzuk, and are licensed from icondrawer.com.
The sndeditor.gadget is based on the original work of Fredrik Wikström.
The resampler.class module utilizes libsamplerate, © 2012-2016 Erik de Castro Lopo; AmigaOS4 port by Fredrik Wikström.
The sndio.class module handles audio files using:
libsndfile, developed by Erik de Castro Lopo and currently maintained by the libsndfile team; AmigaOS4 port by Fredrik Wikström;
libflac, developed by Josh Coalson, Erik de Castro Lopo and the Xiph.Org Foundation; AmigaOS4 port by Fredrik Wikström;
libogg and libvorbis, developed by the Xiph.Org Foundation; AmigaOS4 port by Fredrik Wikström;
libmp3lame, written by Mike Cheng and various other developers; AmigaOS4 port by Michael Trebilcock;
libmpg123, written by Michael Hipp, Thomas Orgis and various other developers; AmigaOS4 port by Fredrik Wikström;
libopus, developed by the Xiph.Org Foundation; AmigaOS4 port by Roman Kargin.
The toolbar.gadget was written by Daniel Jedlicka, © A-EON Technology Ltd.
The infodata.gadget was written by Mark Ritter, © A-EON Technology Ltd.
Thanks
Fredrik Wikström for his sound editor gadget code, which saved me a lot of heavy lifting.
Andy Broad, Colin Wenzel, Tony Wyatt, Steven Solie, Thomas Rapp and Defor/Vectors for programming help and tips.
Roman Kargin, George Sokianos, Krzysztof Radzikowski, Mikael Burman and Rafał Chyła for testing and feedback.
Javier de las Rivas, Mario Locati, Kevin Taddeucci, Enrique Mecklenburg Serkovic, Jan Petkov, Martin Cornelius, Thomas Kölsch, Richard Barfoot, Mikael Burman, Dwayne Jarvis, Michael Mijatov, Paul Koster, David Woolley, Gerd Frank, Dave Koelman and Janne Peräaho for their generous donations.
Everybody else who has contributed to the program in one way or another.